Apply Application Security
Volt MX Iris protects all applications using methods like design time security, critical business logic security, and on-device encryption. All the applications developed through Volt MX Iris are compliant with Payment Card Industry Data Security Standard (PCI DSS), HIPAA/HITECH, SOC2 Type II, ISO 270001:2013, and address OWASP top 10 mobile vulnerabilities, support Single Sign-On (SSO), and Multi-Factor Authentication (MFA), Federal Information Processing System (FIPS) 140-2. Standards followed by Volt MX Iris adhere to Microsoft Security Development Lifecycle (SDLC) for product development, Open Web Application Security Project (OWASP) for secure coding and testing, Web Application Security Consortium (WASC) guidelines for threat modeling, coding, and testing, and follow Application Security Verification Standard (ASVS) for testing security controls.
For enhanced security, Volt MX provides strong application protection solutions by using anti-tampering mechanisms, White Box Cryptography (WBC), Cryptography and Encryption APIs, and also can secure network communications. Following are two methods you can use to enhance security in your application.
- VoltMX APIs - You can make your application more secure by protecting the data in your application using the security APIs provided by Volt MX Iris. Data can be encrypted using Cryptography APIs, offline data can be encrypted and stored using SQL Database Encryption APIs, and network communications can be secured using two-way SSL/Mutual Authentication (SSL Pinning + Client Authentication).
- Protected Mode option - Applications built in Volt MX Iris can use the additional security enhancements by building the application in the Protected Mode. Volt MX Iris Platform code for iOS and Android is equipped with mechanisms that can protect your application by detecting attacks like tampering, swizzling, debugging, jail breaking (iOS), rooting (Android), and information disclosure. Additional security mechanisms are provided through the use of White Box Cryptography to protect application business logic and source code. Application reacts to the attack by exiting upon detecting attacks to prevent further attempts.
This topic covers the following:
Build Runtime Security in the Application
Protect the Application Binaries
Protection Mechanisms Provided by Volt MX Iris
RSA Public/Private Key Pair Generation, Encryption, and Usage
Configure Project Settings in Volt MX Iris
Application Security Guidelines
Build Runtime Security in the Application
You can build runtime security in your application using the following Volt MX Iris features and API's:
- Data can be encrypted using Cryptography APIs.
- Offline data can be encrypted and stored in SQL Database Encryption APIs.
- Network communications can be secured using Two-way SSL/Mutual Authentication (SSL Pinning + Client Authentication) which defends against man-in-the-middle attacks by authenticating both the client and server to each other.
SSL Pinning - Windows Limitation
For Windows devices, when SSL pinning is implemented, and the HTTPRequest initiates, if a Man in the Middle (MitM) attack accesses the HttpRequest (for example, fiddler), the HttpRequest goes to the server through the MitM and comes with a response. However, the client does not receive the response as the MitM attack corrupts the certificate of the response during the communication process. This applies to all windows channels.
In case of Android and iOS platforms, if there is a MitM attach, the HttpRequest aborts.
Protect the Application Binaries
In Volt MX Iris, Protected Mode option enables several security features that secure the binary at build time by including multiple self-protection security mechanisms. To use the option, enable the Protected Mode check box in the Project Settings dialog. If an application attack is observed, the security mechanism exits the application.
In this section, you will learn about:
Protection Mechanisms Provided by Volt MX Iris
Volt MX provides the following application and code-level mechanisms to protect your application:
- Anti-tamper Protection - Following are the application self-protection security mechanisms used by Volt MX Iris that react by exiting application on detecting an attack:
- Tamper Protection - Fights against application compromise by detecting modifications in the application.
- Jailbreak / Root detection – Resists runtime attacks by preventing app from running on a rooted or jailbroken device. For more information on, click here.
- Swizzling detection – Prevents the abuse/misuse of the swizzling feature to override methods at runtime. This attack is specific to Objective C in iOS.
- Anti-debugging - Prevents debugging of a production application to prevent attackers from analyzing the application at runtime.
- Protecting Cryptographic Keys using White Box Cryptography (WBC) - Cryptographic keys are critical to securing systems such as applications and communications, and therefore must be protected at all times. Volt MX provides powerful secure cryptographic capability beyond the native operating system’s capabilities. VoltMX's encryption and decryption uses a secure process known as White Box Cryptography to perform encryption and decryption while keeping the keys safe. The keys are never present in static form or in memory at runtime. WBC is a secure implementation of cryptographic algorithms in a system that employs cryptographic algorithm and keys. Strong algorithms are used for encryption and decryption, insecure, and deprecated algorithms are not used.
RSA Key Pair Generation, Encryption and Usage
Prerequisites
For OpenSSL command to work, for the Windows environment, you can use a couple of different third-party tools, such as Git Bash, which is available here, and Cygwin, which is available here.
To generate, encrypt, and use the RSA key pair, follow these steps:
- Open a terminal (Git Bash or Cygwin terminal in Windows ) and type openssl.
-
Generate RSA public/private key pair using OpenSSL.
Recently the cygwin and git bash tools were using the upgraded version of openssl ie 3.0 .The expected format as shown is of pkcs1 format of generating pem files using openssl. From openssl 3.0 and higher versions by default it generates pkcs8 encoded format , so in order to generate required pkcs1 format we have to first convert the generated encoded pkcs8 private key to pkcs1 using openssl and generate public key. Below are the steps for the same.
a. openssl genrsa -out private.pem -verbose 2048. // generates pkcs8 format.
openssl genrsa -out private_key.pem 2048
b. openssl pkey -in private.pem -traditional -out private_key.pem. // generates pkcs1 format.
openssl rsa -pubout -in private_key.pem -out public_key.pemc. openssl rsa -in private_key.pem -pubout -traditional -out public_key.pem // generate publickey from pkcs1 format key.
openssl rsa -text -in private_key.pemd. openssl rsa -in public_key.pem -pubin -text.
i. less private_key.pem to verify that it starts with a -----BEGIN RSA PRIVATE KEY-----. ii. less public_key.pem to verify that it starts with a -----BEGIN PUBLIC KEY——.- Engage support public key and Volt MX Iris version. This step is applicable for Android, iOS platforms, and responsive Web/SPA platform.
Important: Public key must not be shared with anyone except Volt MX.
-
For Android and iOS platforms, VoltMX's security team validates the details and encrypts your public key.
For the Responsive Web/SPA platform, VoltMX's security team validates the information and shares the unique clientID and clientSecret through email. You must then use these details to create a postbuild task. -
VoltMX's security team then returns the encrypted public key to you through email.
Important: You must not share your private key with anyone including Volt MX. In case of a key compromise for the Android, iOS and Responsive Web/SPA platforms, generate a new set of keys and send the public key to voltmxlicensing@hcl.com.
-
Navigate to your Volt MX Iris workspace and create a __encryptionkeys folder.
-
Place the following keys received from Volt MX in __encryptionkeys folder.
a. Your private key. The private key must be named as
private_key.pem.b. Encrypted public keys provided by Volt MX Iris.
Configure Project Settings in Volt MX Iris
To enable Protected Mode in Project Settings, follow these steps:
- In Volt MX Iris, got to Project > Settings.
The Project Settings window appears. - Click Protected Mode.
- Under Encryption Keys, provide the Public Key and the Private Key.
You can read the information on the screen on how to procure the keys. -
Click Finish.
-
From the Build menu, select Build and Publish Native .
The Build and Publish Native dialog box appears. - Select the required channels and platforms.
-
In the Build Mode drop-down list, click Protected.
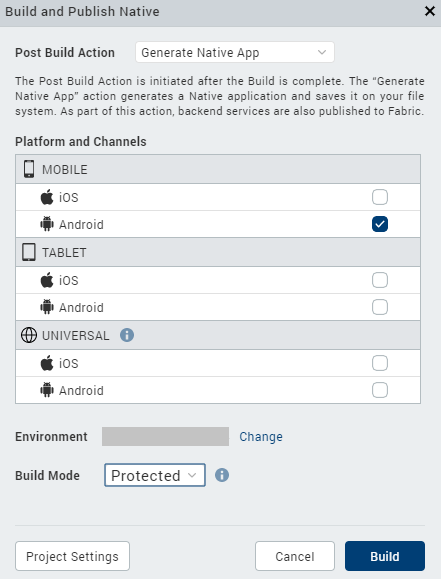
-
Click Build.
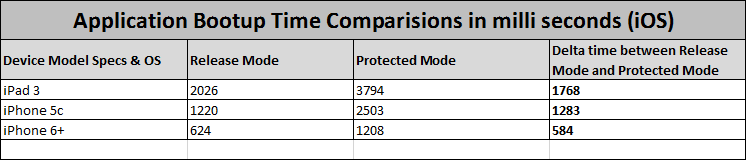
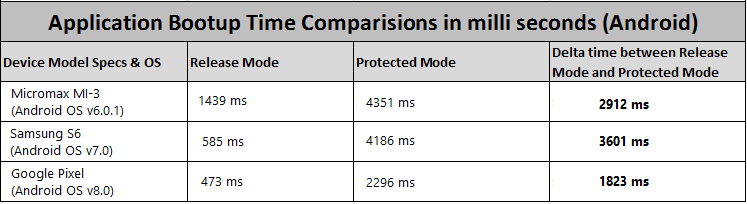
Impact on App's Performance
While enabling security features in your application ensures attacks are prevented, your application's start-up time may slow. Following image provides you insight on the performance hit if you enable the Protected Mode option.
Application Security Guidelines
It is recommended that you follow the security guidelines to ensure the application is fully protected.
- Data at Rest
- Data Protection
- Database Security
- Input Validation
- Output Encoding
- Data in Transit
- Authentication
- Session Management
- Access Control
- Error Handling and Logging
- File Management
Data at Rest
- Do not store sensitive information on a device (especially on jailbroken and rooted devices).
- Avoid hard coding sensitive data (cryptographic keys, passwords).
- Consider removing any data stored and cached on the device when a user logs out of the application or removes application from the device.
Note: If data must be stored, ensure that it is encrypted by leveraging VoltMX’s Cryptographic APIs. In addition, Volt MX Iris recommends building the application in Protected Mode for additional protection of the binary. Although Volt MX provides many security features and layers of defense, we cannot guarantee that your application will remain secure if best practices and secure design principles are not followed.
Data Protection
- Protect server-side source code from being downloaded by a user.
- Do not store passwords, connection strings, or other sensitive information in clear text or in any non-cryptographically secure manner on the client side. This includes embedding in insecure formats like Microsoft Viewstate, Adobe Flash, or compiled code.
- Remove comments in user accessible production code that may reveal back-end system or other sensitive information.
- Remove debug code and functionality from production code.
- Do not include sensitive information in HTTP GET request parameters.
- Disable autocomplete features on forms containing sensitive information including authentication.
- Disable client side caching on pages containing sensitive information. Cache-Control - no-store, may be used in conjunction with the HTTP header control Pragma: no-cache, which is less effective, but is HTTP/1.0 backward compatible.
- The application should support the removal of sensitive data when the data is no longer required. (personal information or certain financial data), such as upon a logout.
Database Security
- Use strongly typed parameterized queries.
- Use input validation and output encoding and ensure you address meta characters. If these fail, do not run the database command.
- Ensure that variables are strongly typed.
- The application should use the lowest possible level of privilege when accessing the database.
- Ensure that only cryptographically strong one-way salted hashes of passwords are stored and that the table/file that stores the passwords and keys is write-able only by the application. (Do not use the MD5 algorithm if it can be avoided)
Input Validation
- Identify all data sources and classify them into trusted and untrusted. Validate all data from untrusted sources (for example, databases, file streams, and so on.)
- There should be a centralized input validation routine for an application.
- Specify proper character sets, such as UTF-8, for all sources of input.
- Encode data to a common character set before validating (canonicalize).
- All validation failures should result in input rejection.
- Determine if the system supports UTF-8 extended character sets. If so, validate after UTF-8 decoding is completed.
- Validate all client provided data before processing, including all parameters, URLs and HTTP header content (for example, cookie names and values). Include automated postbacks from JavaScript, Flash, or other embedded code.
- Verify that header values in both requests and responses contain only ASCII characters.
- Validate data from redirects (an attacker may submit malicious content directly to the target of the redirect, thus circumventing application logic and any validation performed before the redirect).
- Validate for expected data types.
- Validate data range.
- Validate data length.
- Validate all input against a white list of allowed characters, when possible.
- If any potentially hazardous characters must be allowed as input, implement additional controls like output encoding and secure task-specific APIs. You should also account for the use of data throughout the application . Examples of common hazardous characters include:
< > " ' % ( ) & + \ \' \"
- If your standard validation routine cannot address the following inputs, then they should be checked discretely
- Check for null bytes (%00).
- Check for new line characters (%0d, %0a, \r, \n).
- Check for dot-dot-slash" (../ or ..\) path alterations characters. In cases where UTF-8 extended character set encoding is supported, address alternate representation like
%c0%ae%c0%ae/. Utilize canonicalization to address double encoding or other forms of obfuscation attacks.
Output Encoding
- Conduct all encoding on a trusted system (for example, the server)
- Use a standard, tested routine for each type of outbound encoding.
- Contextually output encode all data returned to the client that originated outside the application's trust boundary. HTML entity encoding is one example, but does not work in all cases.
- Encode all characters unless they are known to be safe for the intended interpreter.
- Contextually sanitize all output of untrusted data to queries for SQL, XML, and LDAP.
- Sanitize all output of untrusted data to operating system commands.
Data in Transit
- Implement encryption for the transmission of all sensitive information. This should include TLS for protecting the connection and may be supplemented by discrete encryption of sensitive files or non-HTTP connections.
- TLS certificates should be valid and have the correct domain name. The certificates also should be current and be installed with intermediate certificates when required.
- Failed TLS connections should not fall back to an insecure connection.
- Use TLS for connections to external systems that involve sensitive information or functions.
- Use a single standard TLS implementation that is configured appropriately.
- Use TLS connections for all content requiring authenticated access and for all other sensitive information.
- If SSL/TLS is used, do not mix use of encrypted and unencrypted communication (i.e. do not use HTTP and HTTPS in the application) because you may inadvertently disclose information over an unencrypted channel.
- Use mutual authentication (Two-Way SSL) to mitigate man-in-the-middle attacks.
- Use certificate and public key pinning (https://www.owasp.org/index.php/Certificate_and_Public_Key_Pinning) to mitigate man-in-the-middle attacks.
- Specify character encodings for all connections.
- Filter parameters containing sensitive information from the HTTP referer, when linking to external sites.
Note: If certificate pinning is used, be aware that when the SSL certificate expires or is revoked, a timely application update is required to ensure that users can communicate with the server and avoid interrupted service. Plan an application update for updating certificates.
Authentication
- Authenticate each API call and resource.
- Authentication failure responses should not indicate which part of the authentication data is incorrect. For example, instead of Invalid username or Invalid password, just use Invalid username and/or password for both. Error responses must be identical in both display and source code.
- Use only HTTP POST requests to transmit authentication credentials.
- Enforce password complexity requirements established by policy or regulation. Authentication credentials should be sufficient to withstand attacks that are typical of the threats in the deployed environment. (requiring alphanumeric and/or special characters).
- Enforce password length requirements established by policy or regulation. Eight characters is commonly used, but 16 is better. Also, consider the use of multi-word pass phrases.
- Password entry should be obscured on the user's screen. (for example, on web forms use the input type password).
- Enforce account disabling after an established number of invalid login attempts (for example, a limit of five attempts is common). The account must be disabled for a period of time sufficient to discourage brute-force guessing of credentials, but not so long as to allow for a denial-of-service attack to be performed.
- Password reset and changing operations require the same level of controls as account creation and authentication.
- If using email-based resets, only send email to a pre-registered address with a temporary link/password.
- Temporary passwords and links should have a short expiration time.
- Enforce the changing of temporary passwords on the next use.
- Notify users when a password reset occurs.
- Prevent re-use of passwords.
- Disable Remember Me functionality for password fields.
- The last use (successful or unsuccessful) of a user account should be reported to the user upon the next successful log-in.
- Re-authenticate users before performing critical operations.
- Use multi-factor authentication for highly sensitive or high value transactional accounts.
- If using third-party code for authentication, inspect the code carefully for malicious code.
Session Management
- Use the server or framework’s session management controls. The application should only recognize the session identifiers as valid.
- Log-out functionality should be available from all pages protected by authorization.
- Set the domain and path for cookies containing authenticated session identifiers to an appropriately restricted value for the site.
- Session management controls should use well-vetted algorithms that ensure sufficiently random session identifiers.
- Establish a session-inactivity timeout that is as short as possible, based on balancing risk and business functional requirements. In most cases, the timeout should be no more than several hours.
- Disallow persistent log-ins and enforce periodic session terminations, even when the session is active. Especially for applications supporting rich network connections or connecting to critical systems. Termination times should support business requirements, and a user should receive sufficient notification to lessen negative impacts.
- If a session was established before log-in, close that session and establish a new session after a successful log-in.
- Generate a new session identifier on any re-authentication.
- Do not allow concurrent log-ins with the same user ID.
- Do not expose session identifiers in URLs, error messages, or logs. Session identifiers should only be located in the HTTP cookie header. For example, do not pass session identifiers as GET parameters.
- Periodically generate a new session identifier if the connection security changes from HTTP to HTTPS, as can occur during authentication. Within an application, it is recommended to consistently use HTTPS rather than switching between HTTP to HTTPS.
- Generate a new session identifier and deactivate the old one periodically. (This action can mitigate certain session hijacking scenarios where the original identifier was compromised).
- Set HttpOnly (https://www.owasp.org/index.php/HttpOnly) attributes on all cookies.
- Set the
secureattribute for cookies transmitted over a TLS connection. https://www.owasp.org/index.php/SecureFlag
Access Control
- Access controls should fail securely.
- Deny all access if the application cannot access its security configuration information.
- Enforce authorization controls on every request, including those made by server-side scripts, includes, and requests from rich client-side technologies like AJAX and Flash.
- Segregate privileged logic from other application code.
- Restrict access to files or other resources, including those outside the application's direct control, to only authorized users.
- Restrict access to protected URLs to only authorized users.
- Restrict access to protected functions to only authorized users.
- Restrict direct object references to only authorized users.
- Restrict access to services to only authorized users.
- Restrict access to application data to only authorized users.
- Restrict access to user and data attributes, and policy information used by access controls.
- Restrict access to security-relevant configuration information to only authorized users.
- Server-side implementation and presentation layer representations of access control rules must match.
- If state data must be stored on the client, use encryption and integrity checking on the server side to catch state tampering.
- Enforce application logic flows to comply with business rules.
- Limit the number of transactions a single user or device can perform in a given period of time. The transactions/time should be above the actual business requirement, but low enough to deter automated attacks.
- Use the referer header as a supplemental check only. The referer header should never be the sole authorization check, because it can be spoofed.
- If long authenticated sessions are allowed, periodically re-validate a user’s authorization to ensure that the user's privileges have not changed. If the privileges have changed, log the user out and force the user to re-authenticate.
- Implement account auditing and enforce the disabling of unused accounts. (for example, after no more than 30 days from the expiration of an account’s password).
- An application must support disabling of accounts and terminating sessions when authorization ceases. (for example, changes to role, employment status, business process, and so on).
Error Handling and Logging
- Do not disclose sensitive information , such as system details, session identifiers or account information,
- Use error handlers that do not display debugging or stack trace information.
- Implement generic error messages, and use custom error pages.
- An application should handle application errors and not rely on the server configuration.
- Properly free allocated memory when error conditions occur.
- Error handling logic associated with security controls should deny access by default.
-
All logging controls should be implemented on a trusted system (that is the server)
- Logging controls should support successes and failures of specified security events.
- Ensure logs contain important log event data.
-
Ensure log entries that include un-trusted data will not execute as code in the intended log viewing interface or software.
-
Restrict access to logs to only authorized individuals.
- Use a master routine for all logging operations.
- Do not store sensitive information in logs, including unnecessary system details, session identifiers, or passwords.
- Ensure that a mechanism exists to conduct log analysis.
- Log all input validation failures.
- Log all authentication attempts, especially failures.
- Log all access control failures.
- Log all apparent tampering events, including unexpected changes to state data.
- Log attempts to connect with invalid or expired session tokens.
- Log all system exceptions.
- Log all administrative functions, including changes to the security configuration settings.
- Log all back-end TLS connection failures.
- Log cryptographic module failures.
- Use a cryptographic hash function to validate log entry integrity.
File Management
- Require authentication before allowing a file to be uploaded.
- Limit the type of files that can be uploaded to only those types that are needed for business purposes.
- Validate uploaded files are the expected type by checking file headers. Checking for file type by extension alone is not sufficient.
- Do not save files in the same web context as the application. Files should either go to the content server or in the database.
- Prevent or restrict the uploading of any file that may be interpreted by the web server.
- Turn off execution privileges on file upload directories.
- When referencing existing files, use a white list of allowed file names and types. Validate the value of the parameter being passed, if the value does not match one of the expected values, either reject it or use a hard-coded default file value for the content instead.
- Do not pass directory or file paths, use index values mapped to pre-defined list of paths.
- Never send the absolute file path to a client.
- Ensure application files and resources are read only.
- Scan user uploaded files for viruses and malware.
Note: For a more comprehensive list, Volt MX Iris recommends the secure coding checklists and best practices maintained by the Open Web Application Security Project (OWASP).
Jailbroken and Rooted Device Detection
Android
On Android devices, root detection dialog displays when the app is launched in the foreground. The detection happens through the Volt MX Iris auto-generated launcher activity using VoltMXMain. If a user writes custom activities using FFI and Framework, root detection does not happen.
If an app is triggered by background sources (Push, GeoFence, SMS, etc.,) root detection dialog does not display. However, a process is created in the background for this app with no application data loaded in memory.
Default Error Message: This device does not meet the minimum security requirements for this application. Please contact the app publisher for more details. The application will exit when you press OK.
You can modify the Default Error Message using the i18N string defined with key ROOT_DETECTION_MESSAGE. If you do not have an i18n string, default standard error message appears.
Iris tries to respect the i18N key defined in a locale which matches current device locale and then the i18N key defined in a locale which matches Iris/IDE set default locale and then the Default Error Message in order of preference.
The following APIs are not respected as they are available only when JavaScript is loaded and JavaScript is never loaded when rooting of a device is detected.
- voltmx.i18n.setCurrentLocaleAsync
- voltmx.i18n.setDefaultLocaleAsync
Important: You must define your locate specific error message with i18n key ROOT_DETECTION_MESSAGE.
To modify the default error message for Android, do the following:
- Create a stringconstants.xml file with the following content. ```
``` 2. Modify the Custom Root Detection Message as per your requirement 3. Copy the file in the following folders as required
For mobile - **`<WorkSpace>\<Application>\resources\mobile\native\android\values`**

For tablet - **`<WorkSpace>\<Application>\resources\tablet\native\androidtab\values`**
iOS
Iris tries to respect the i18N key defined in a locale which matches current device locale and then the i18N key defined in a locale which matches Iris/IDE set default locale and then the Default Error Message in order of preference.
Whenever an app is launched on a jailbroken iOS device, a jailbroken detection dialog will appear.
To customize the jailbroken dialog in i18n keys manually, do the following:
- In Volt MX Iris, navigate to Project > Settings > Application, under the Internationalization (i18n) section, select the Enable checkbox.
- Click Configure.
The Configure Internationalization dialog box displays. - In the Configure Internationalization dialog box, an initial row for an i18n key and the locales you want your app to support is displayed. In the Key field, type the name for your jailbroken key, ROOT_DETECTION_MESSAGE.
- In each locale's field for the ROOT_DETECTION_MESSAGE key, enter the word or phrase. Here, for English locale, define your message.
- Click Finish.
For more information on how to manually add keys in i18N, click here.