Object Triggered Workflow Implementation
Usecase
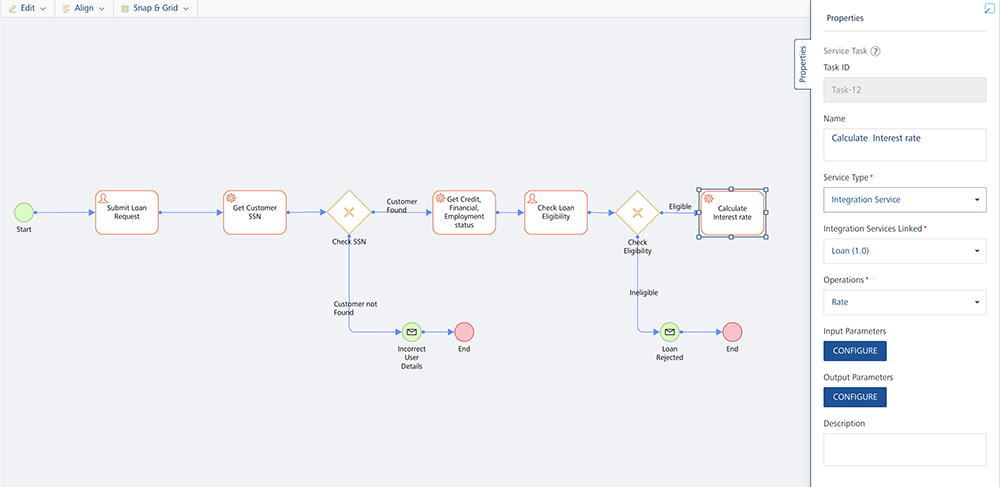
Let us create a basic Workflow that is invoked whenever a new loan application is submitted. Using Workflow, we can automate the different phases through which the loan application passes before approval or rejection. Whenever a manual input is required, the Workflow will pause at that phase and the process will resume automatically after an appropriate action is taken by the applicant.
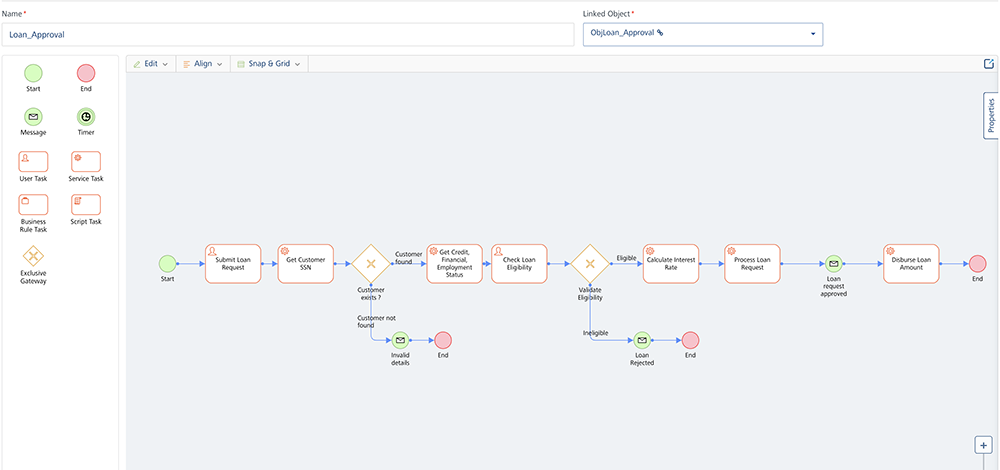
In this example, the loan application process will have the following steps:
- When a loan application is submitted, the SSN information is retrieved automatically based on the information provided in the application.
- If the SSN is invalid, an email will be sent to the applicant stating that the details in the application are incorrect.
- If the SSN is valid, the credit score is retrieved automatically, and the financial and employment status is verified by the bank.
- After the financial details are verified, the applicant’s loan eligibility is calculated.
- If the applicant is not eligible, an email will be sent to the applicant stating that the loan application was rejected as the applicant is not eligible.
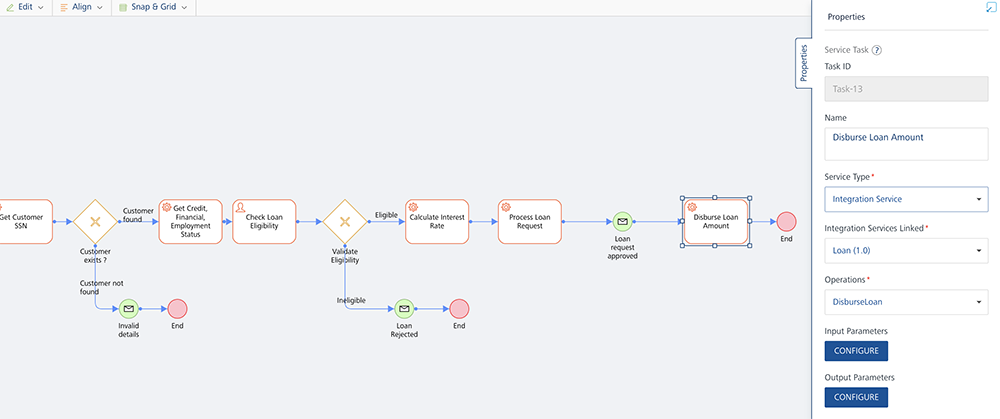
- If the applicant is eligible, the interest rate is calculated automatically.
- The loan request is processed based on the calculated interest rate and a message is sent to the applicant stating that the loan request is processed.
- The loan amount is disbursed to the applicant’s bank account.
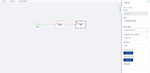
Loan Application Workflow
Pre-requisites
To create a workflow for the steps that were discussed in this example, you must have the necessary Integration Services configured in your Volt MX Foundry console.
Click here to download the Integration Services required to create the workflow and import the same into your Volt MX Foundry console.
Create Workflow
To create the Loan Application workflow, do the following:
- From the dashboard in Volt MX Foundry console, click the Foundry app where you have imported the Integration Services related to this use case, and click the Workflows tab. The Workflow’s landing page appears.
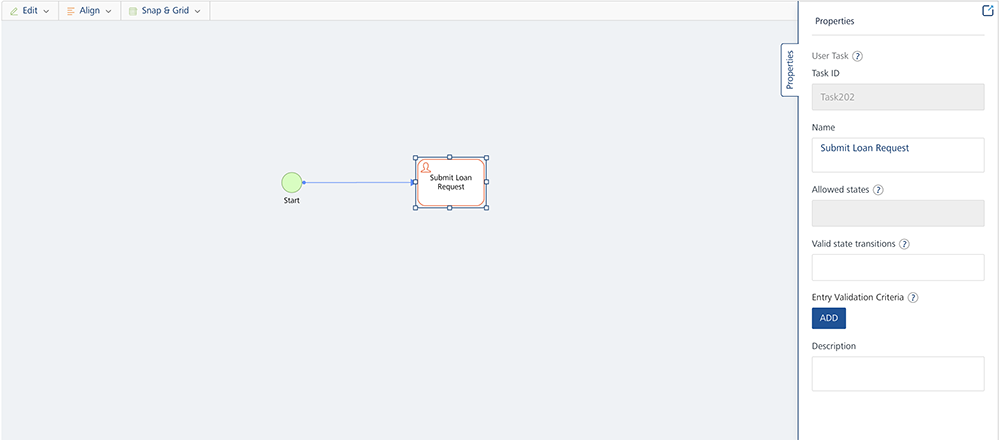
- Click Configure New from the landing page, the Configure New screen appears with a Start and User Task node placed in the canvas area by default.
- In the Name field, type a unique name for the new Workflow service. For example: LoanApplication.
- From the Linked Object dropdown, click Use Default. It creates a new object service. The name of the new object service will depend on the name of the new Workflow service name and this workflow will be linked to said Object service.
- Select the User Task in the Workflow canvas area and click the Properties pane. You can do the following in the Properties pane:
- In the Name field, type the required name of the user task based on the activity it handles. For example: Submit Loan Request.
- In the Valid state transitions field, type SUBMITTED.
-
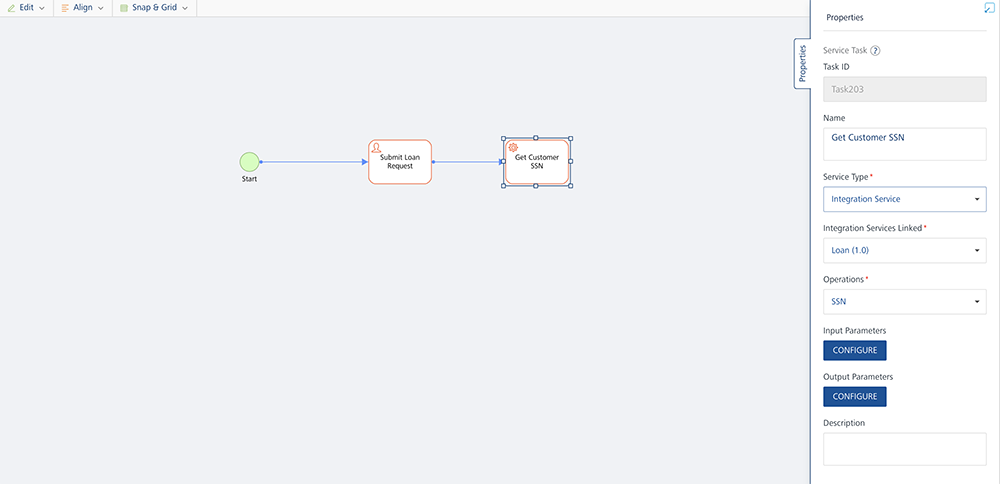
Drag and drop a Service Task next to the Submit Loan Request user task and connect them. Click the Properties pane. You can do the following in the Properties pane:
- In the Name field, type the required name of the service task based on the activity it handles. For example: Get Customer SSN.
- From the Service Type list, select Integration Service.
- From the Integration Services Linked list, select Loan.
- From the Operations list, select SSN.
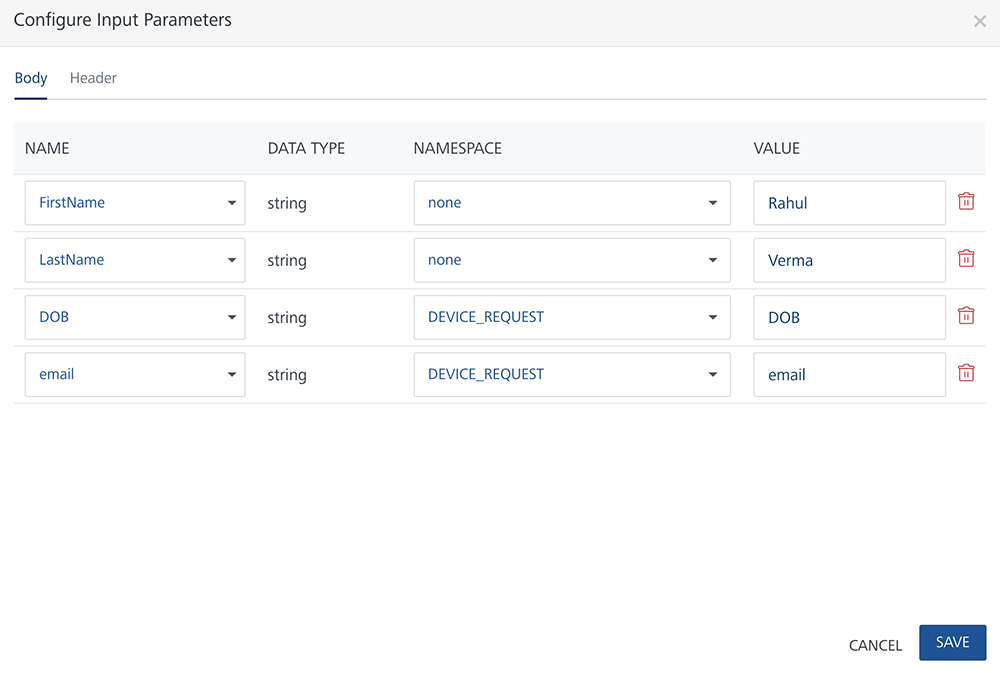
- Click Input Parameters Configure to manage the integration service’s request input parameters. In the Namespace column, select None for all the input parameters displayed and type appropriate data for each parameter in the Value column.
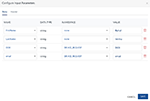
- Click Output Parameters Configure to manage the integration service’s output response. By default, response from each service task is saved in the Foundry_Workflow_Context namespace. Type SSN which acts as a variable for the namespace (Foundry_Workflow_Context.SSN).
 * Drag and drop an Exclusive Gateway next to the Get Customer SSN service task and connect them. Click the Properties pane. You can do the following in the Properties pane:
* In the Name field, type the required name of the exclusive gateway based on the activity it handles. For example: Check SSN.
* As Check SSN is an exclusive gateway, two flows emerge from here. One flow determines the path of the workflow if the SSN is found. Name the flow as Customer Found. The other flow determines the path of the workflow if the SSN is invalid. Name the flow as Customer Not Found
* Click the Customer Found flow, and do the following:
* Drag and drop an Exclusive Gateway next to the Get Customer SSN service task and connect them. Click the Properties pane. You can do the following in the Properties pane:
* In the Name field, type the required name of the exclusive gateway based on the activity it handles. For example: Check SSN.
* As Check SSN is an exclusive gateway, two flows emerge from here. One flow determines the path of the workflow if the SSN is found. Name the flow as Customer Found. The other flow determines the path of the workflow if the SSN is invalid. Name the flow as Customer Not Found
* Click the Customer Found flow, and do the following:
In the Properties pane, click Edit under Entry Validation criteria. * Click Add Condition. Select BACKEND_RESPONSE from the Namespace list and in the Value field type SSN. * From the operators list select!=Nulland click Save.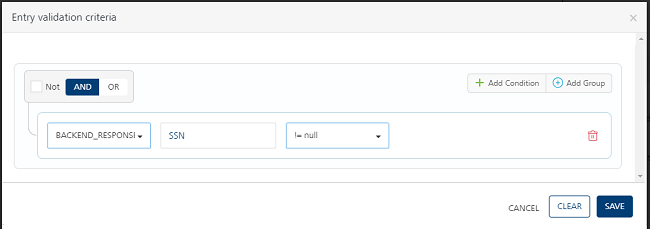 * Click the Customer Not Found flow, and do the following:
In the Properties pane, click Edit under Entry Validation criteria. * Click Add Condition. Select BACKEND_RESPONSE from the Namespace list and in the Value field type SSN. * From the operators list select==Nulland click Save.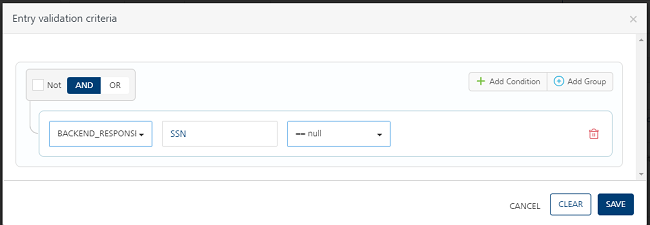 * Connect the Customer Not Found flow with a Message Task and click the Properties pane. You can do the following in the Properties pane:
* In the Name field, type the required name of the message task based on the activity it handles. For example: Incorrect User Details.
* Click Compose Email and configure the email template.
* In the Email-Template tab, type the TO, CC, and the name of the recipient in Body with appropriate message. You can provide $ variables like $email1, $email2, and $FirstName respectively in the required fields.
* In the Parameters tab, in the Name column, type the $variable given in email template, select the Namespace value as None and provide the required $variable data in the Value column.
* Place an End node after the Incorrect User Details message task to finish the SSN is invalid flow path.
* Connect the Customer Found flow with a Service Task and click the Properties pane. You can do the following in the Properties pane:
* Connect the Customer Not Found flow with a Message Task and click the Properties pane. You can do the following in the Properties pane:
* In the Name field, type the required name of the message task based on the activity it handles. For example: Incorrect User Details.
* Click Compose Email and configure the email template.
* In the Email-Template tab, type the TO, CC, and the name of the recipient in Body with appropriate message. You can provide $ variables like $email1, $email2, and $FirstName respectively in the required fields.
* In the Parameters tab, in the Name column, type the $variable given in email template, select the Namespace value as None and provide the required $variable data in the Value column.
* Place an End node after the Incorrect User Details message task to finish the SSN is invalid flow path.
* Connect the Customer Found flow with a Service Task and click the Properties pane. You can do the following in the Properties pane:
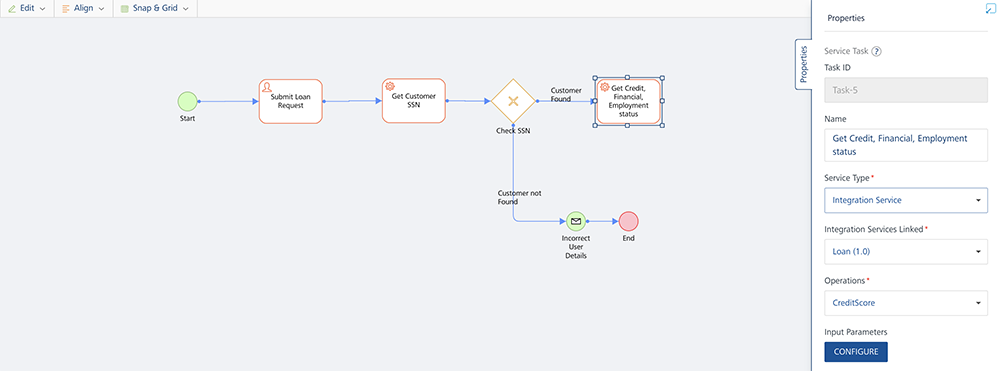
In the Name field, type the required name of the service task based on the activity it handles. For example: Get CreditScore, Financial and Employment Status. * Link this task to an Integration service and select Loan and CreditScore in the respective dropdowns as you have done in the previous service task. * Click Input Parameters Configure to manage the integration service’s request input parameters. In the Namespace column, select Foundry_Workflow_Context the input parameter and type SSN in the Value column as the output of the Get Customer SSN was stored in Foundry_Workflow_Context.SSN. * Click Output Parameters Configure to manage the integration service’s output response. By default, response from each service task is saved in the Foundry_Workflow_Context namespace. Type CreditScore which acts as a variable for the namespace (Foundry_Workflow_Context.CeditScore).
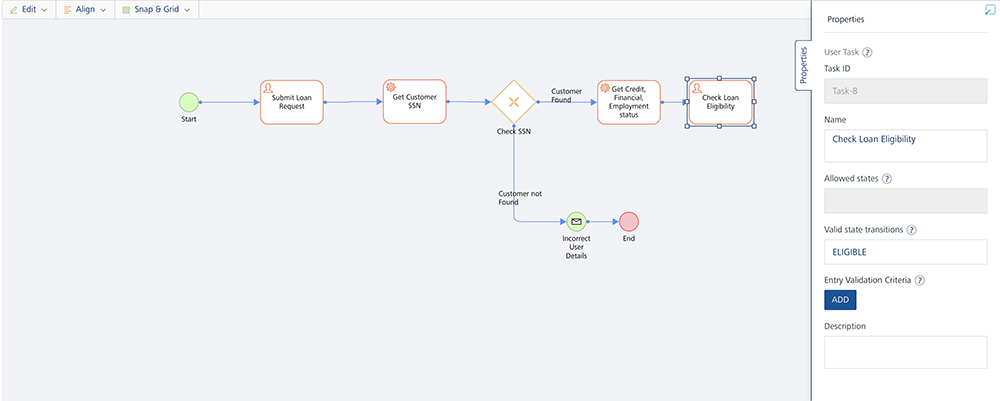
* Drag and drop a User Task next to the Get CreditScore, Financial and Employment Status service task click the Properties pane. You can do the following in the Properties pane:
In the Name field, type the required name of the user task based on the activity it handles. For example: Check Loan Eligibility. * In the Allowed States field, type SUBMITTED. * In the Valid state transitions field, type ELIGIBLE.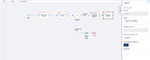 * Drag and drop an Exclusive Gateway next to the Evaluate Loan Eligibility user task click the Properties pane. You can do the following in the Properties pane:
* In the Name field, type the required name of the exclusive gateway based on the activity it handles. For example: Check Eligibility.
* As Check Eligibility is an exclusive gateway, two flows emerge from here. One flow determines the path of the workflow if the loan is Eligible, and the other flow determines the path of the workflow if the loan is Ineligible.
* Click the Eligible flow, and do the following:
* In the Properties pane, click Edit under Entry Validation criteria.
* Click Add Condition. Select BACKEND_RESPONSE from the Namespace list and in the Value field type WorkflowField.
* From the operators list select
* Drag and drop an Exclusive Gateway next to the Evaluate Loan Eligibility user task click the Properties pane. You can do the following in the Properties pane:
* In the Name field, type the required name of the exclusive gateway based on the activity it handles. For example: Check Eligibility.
* As Check Eligibility is an exclusive gateway, two flows emerge from here. One flow determines the path of the workflow if the loan is Eligible, and the other flow determines the path of the workflow if the loan is Ineligible.
* Click the Eligible flow, and do the following:
* In the Properties pane, click Edit under Entry Validation criteria.
* Click Add Condition. Select BACKEND_RESPONSE from the Namespace list and in the Value field type WorkflowField.
* From the operators list select ==INELIGIBLEand click Save. * Click the Ineligible flow, and do the following: * In the Properties pane, click Edit under Entry Validation criteria. * Click Add Condition. Select BACKEND_RESPONSE from the Namespace list and in the Value field type WorkflowField. * From the operators list select!=ELIGIBLEand click Save. * Connect the Ineligible flow with a Message Task and click the Properties pane. You can do the following in the Properties pane: * In the Name field, type the required name of the message task based on the activity it handles. For example: Loan Application Rejected. * Click Compose Email and configure the email template. * In the Email-Template tab, type the TO, CC, and the name of the recipient in Body with appropriate message. You can provide $ variables like $email1, $email2, and $FirstName respectively in the required fields. * In the Parameters tab, in the Name column, type the $variable given in email template, select the Namespace value as None and provide the required $variable data in the Value column. * Place an End node after the Loan Application Rejected message task to finish the Ineligible flow path. * Connect the Eligible flow with a Service Task and click the Properties pane. You can do the following in the Properties pane:
In the Name field, type the required name of the service task based on the activity it handles. For example: Calculate Interest Rate. * Link this task to an Integration service and select Loan and Rate in the respective dropdowns as you have done in the previous service task. * Configure the output parameter as Rate (Foundry_Workflow_Context.Rate).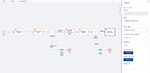 * Drag and drop a Service Task next to the Calculate Interest Rate service task and click the Properties pane. You can do the following in the Properties pane:
In the Name field, type the required name of the service task based on the activity it handles. For example: Process Loan Request. * Link this task to an Integration service and select Loan and ProcessLoan in the respective dropdowns as you have done in the previous service task. * Configure the input parameter as Rate as the output of the Calculate Interest Rate was stored in Foundry_Workflow_Context.Rate. * Configure the output parameter as LoanId (Foundry_Workflow_Context.LoanId).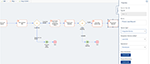 * Drag and drop a Message Task next to the Process Loan Request service task and click the Properties pane. You can do the following in the Properties pane:
* In the Name field, type the required name of the message task based on the activity it handles. For example: Loan Processed.
* Click Compose Email and configure the email template.
* In the Email-Template tab, type the TO, CC, and the name of the recipient in Body with appropriate message. You can provide $ variables like $email1, $email2, and $FirstName respectively in the required fields.
* In the Parameters tab, in the Name column, type the $variable given in email template, select the Namespace value as None and provide the required $variable data in the Value column.
* Drag and drop a Service Task next to the Loan Processed message task and click the Properties pane. You can do the following in the Properties pane:
* Drag and drop a Message Task next to the Process Loan Request service task and click the Properties pane. You can do the following in the Properties pane:
* In the Name field, type the required name of the message task based on the activity it handles. For example: Loan Processed.
* Click Compose Email and configure the email template.
* In the Email-Template tab, type the TO, CC, and the name of the recipient in Body with appropriate message. You can provide $ variables like $email1, $email2, and $FirstName respectively in the required fields.
* In the Parameters tab, in the Name column, type the $variable given in email template, select the Namespace value as None and provide the required $variable data in the Value column.
* Drag and drop a Service Task next to the Loan Processed message task and click the Properties pane. You can do the following in the Properties pane:
In the Name field, type the required name of the service task based on the activity it handles. For example: Disburse Loan Amount. * Link this task to an Integration service and select Loan and Disburse Loan in the respective dropdowns as you have done in the previous service task. * Configure the input parameter as LoanId as the output of the Process Loan Request was stored in Foundry_Workflow_Context.LoanId.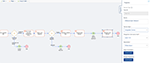 * Place an End node after the Disburse Loan Amount* service task to finish the loan application flow path.

Once the Workflow is created, do the following to publish the Foundry app:
- Click the Publish tab.
- Select the required runtime environment.
- Click Publish.
Test the Workflow
After the app is successfully published, you can check the workflow functionality through the following means:
- Runtime server (Admin console)
- Postman
Runtime Server (Admin Console)
Click the Workflow icon in the Consoles section of the environment where the Foundry app is published. The Workflow Services screen from Admin Console appears in a new tab.
The Workflow Services screen lists all the workflows that were created and published to the current environment. To test the workflow which you have created (LoanApplication), do the following:
- From the side menu, click Object Services.
- Locate the Object service (ObjSvcLoanApplication) that is linked to the LoanApplication workflow. From the App Data Model Objects column select the operation (objLoanApplication) of the linked Object service. The Request Input screen of the selected operation appears.
- From the Operations list, select create (POST).
- Provide the input request body here. The request input will contain fields like the following;
{
  "WorkflowField": "",
  "CustomPrimaryField": "",
  "CreatedBy": "",
  "LastUpdatedBy": ""
}

```6.  Provide the value for "WorkflowField" parameter as **SUBMITTED** as it should be same as the value you provided for **Valid state transitions** field in **Submit Loan Request** user task.
7.  Click **Get Response**. The response will have the following parameters:
{ "CustomPrimaryField":1,"opstatus":0,"httpStatusCode":0 }
> **_Important:_** Use the same "CustomPrimaryField" parameter value received from response while providing input response for other user tasks while testing the workflow.

10.  Now you can check the status of the LoanApplication workflow from Workflow service tab. The Workflow status will be Paused at **Check Loan Eligibility** user task.
11.  Repeat the steps followed from step 2 to step 4.
12.  Provide the value for "WorkflowField" parameter as **ELIGIBLE** as it should be same as the value you provided for **Valid state transitions** field in **Check Loan Eligibility** user task.
13.  Provide a numeric value for "CustomPrimaryField" parameter as “1”.
14.  Click **Get Response**.
15.  Now you can check the status of the LoanApplication workflow from Workflow service tab. The Workflow status will be Completed.

> **_Note:_** In this testing process, it is assumed that all the service tasks, exclusive gateways and message tasks used were executed successfully.

> **_Note:_** To view the execution status of a workflow service by using Volt MX App Services Console, refer to [VoltMX App Services Console > Workflow Services](../../../Foundry/vmf_integrationservice_admin_console_userguide/Content/Workflow.md) section.

### Postman

Testing the Workflow through Postman involves two major steps. First you have to authenticate yourself as a valid user and then invoke the object service which would trigger the Workflow. Perform the following steps to test the workflow:

*   Login to Postman and from the **Launchpad** tab, click **Create a Request**.
*   In the **Enter Request URL** field provide the request URL. The request URL will be same as the Service URL you receive after publishing the Workflow.
    **For example**: https://XXXXXXX.auth. voltmxcloud.com/login
*   Click the Headers tab and provide the following details in KEY and VALUE columns respectively:
    *   Content-Type: application/json
    *   X-VoltMX-App-Key: 69f58xxxxxxxxxxxxx9e35bdcdf2c9ca
    *   X-VoltMX-App-Secret: 92ee7xxxxxxxxxxxxxxx2bdc8525c8cd

    > **_Note:_** You can get the App Key and App Secret from the Publish page.

*   Click **Send**. If you are an authentic user, you will receive a claims token.
    **For example**: `{"claims_token":{"value":"eyAidHlwIjogImp3dCITk9ORSIgfQ.xxxxxxx_kqjJUP1LNue_rA","exp":1578450870000,"integrity_check_required":false,"is_mfa_enabled":false,"mfa_meta":null,"session_id":"e6ecb1ed-606d-4a7c-b05d-442469ca8de8"}`
*   From the verbs list, select POST.
*   In the **Enter Request URL** field provide the request URL for the POST call. The format of the request is as follows: https://FoundryAppName.voltmxcloud.com:XXX/services/data/v1/ObjectServiceName/objects/ObjectName.
    **For example**: https://workflowtesting. voltmxcloud.com:443/services/data/v1/ObjSvcDocTrial/objects/ObjDocTrial
*   Click the **Headers** tab and provide the following details in KEY and VALUE columns respectively:
    *   Content-Type: application/json
    *   X-VoltMX-Authorization: <claims token>

    > **_Note:_** Provide the authorization key in the Value parameter in the Claims token that you received.

*   Click the Body tab and provide the JSON payload here:
{ "WorkflowField": "", "CustomPrimaryField": "", "CreatedBy": "", "LastUpdatedBy": "" }
```* Click Send.