Rules as a Service
User Guide: How Rules as Service Works
Rules as a Service
Volt MX Foundry provides the ability to write business rules in a simplified text form by using the Rules-as-a-Service feature. The Rules service makes defining business logic closer to human language and is built using MVEL. Instead of embedding rules within Foundry integration services, with Rules as a first-class service, the business logic and conditions are externalized and can be managed separately. For example, let’s say in a Banking app there could be certain business rules defined to control whether a customer is eligible for a loan. However, these business rules for loan eligibility (like credit score and income level) might vary from time to time based on market conditions, bank’s promotional offers, and regulatory changes. In such cases, Foundry Rules-as-a-Service provides the ideal design to abstract these business rules from other application logic and manage them separately. This also provides Rules-as-a-Service all the capability of any Foundry service including versioning, export, import across Foundry apps, API management.
You can use the Rules service tab to define and store your business logic as a set of rules. A collection of rules defined in a Rules service are stored in a Ruleset. For example, a Loan Ruleset can have multiple rules such as Home Loan Rule, Education Loan Rule, Vehicle Loan Rule and so on. Similar to how any Foundry service operation can be protected by Operation security levels, rules in a Ruleset can also be protected by Rule Security Level. These are: Authenticated App Users, Anonymous App Users, Public, and Private.
How Rules as Service Works
Rules in a Rules service are not dependent on any back-end system and are executed within the Volt MX App Server. So, rules defined as a service are dependent between a client app and a Foundry app. The rules can be changed for a particular app and republish the app as required. Based on request input parameters in a request sent to a Foundry app, a set of conditions in a particular rule will be evaluated and the corresponding action will be performed whenever the condition matches. And, then Volt MX App Server sends the response to the client.
Why and When to Use Rules-as-a-service
When you are creating an application that has a significant portion of business logic/rules that need to be managed/modified from time to time, define those business logic as separate rules service in your Foundry application. The following are some of the sample use cases where you can use Rules-as-a-service:
- For Banks and financial institutions when they want to develop lending apps – to abstract Rules determining Loan eligibility
- For Retail and e-commerce institutions when they want to separate out promotional campaigns – which can then be modified seasonally
- For Insurance providers when they evaluate if a potential new customer meets eligibility requirements
Use Case:
A bank app with a set of rules defined as a Rules service in a Foundry app is published. A user of this client app sends request to the app to check loan eligibility. The request may contain input params, which can be used to evaluate the condition in Rules, for example, the condition is: Credit Rating between 300 and 669, credit length less than 5. Volt MX App Server executes the logic defined in the rules service in the app based on the input params (creditRatingand creditLengthInYears), and then sends the desired response.
The following table details client requests and Foundry Server responses executed based on a sample rule.
| Step 1 Client App A user sends requests with Input Params to the published Foundry app as follows: |
Step 2 Foundry App with Rules Service published to Volt MX App Server |
|
|---|---|---|
| a. Volt MX App Server executes the logic defined in the Rules service |
b. Volt MX App Server sends the Response to the client app |
|
|
Sample rule name: "Credit Rating between 300 and 669,
credit length less than 5 "
description: "Credit Rating between 300 and
669, credit length less than 5 "
condition: "creditRating >= 300 &&
creditRating <= 669 && creditLengthInYears
<= 5"
actions:
- "results.addParam(\"status\", \"Reject\")"
|
    {
    "opstatus":0,"status" : "Reject"
    }
|
|
Sample rule name: "Credit Rating between 300 and 669,
credit greater than 5 "
description: "Credit Rating between 300 and
669, credit greater than 5"
condition: "creditRating >= 300 &&
creditRating <= 669 && creditLengthInYears >
5 "
actions:
- "results.addParam(\"status\", \"Review\")"
|
    {
    "opstatus":0,"status" : "Review"
    }
|
|
Sample rule name: "Credit Rating between 670 and 750,
credit length less than 5 "
description: "Credit Rating between 670 and
750, credit length less than 5 "
condition: "creditRating >= 670 &&
creditRating < 750 && creditLengthInYears <=
5 "
actions:
- "results.addParam(\"status\", \"Approve\")"
- "results.addParam(\"interestRate\", \"10\")"
|
    {
    "interestRate": "10"
    "opstatus":0,"status" : "Approve"
    }
|
|
Sample rule name: "Credit Rating greater than 750,
credit greater than 5 "
description: "Credit Rating greater than
750, credit greater than 5 "
condition: creditRating >= 750 &&
creditLengthInYears > 5
actions:
- "results.addParam(\"status\", \"Approve\")"
- "results.addParam(\"interestRate\", \"5\")"
|
    {
    "interestRate": "5"
    "opstatus":0,"status" : "Approve"
    }
|
What is the Structure of Rules: Rules have a structure in the form of statements, as shown in the following table:
| Sample Rules Structure |
|---|
name: "< Name of the rule >" |
| Description of Rules Structure |
|
How to Create a Rules Service
To go to the Rules service tab from the Volt MX Foundry Console dashboard, click Add New or select any existing Volt MX Foundry app, and click the Rules tab. The Rules tab landing page appears. Creating a rules service involves two stages, a ruleset and rules. Rules defined in a Rules service are stored in a rules-set. A Ruleset is a collection of rules.
- Create the Service definition for a Rules service.
-
Click CONFIGURE NEW to create a ruleset. The following details are displayed in the Rules service designer.
- In the Name field, provide a unique name for your ruleset.
-
For additional configuration of your ruleset definition, provide the following details in the Advanced section:
Field Description Throttling API throttling enables you to limit the number of request calls within a minute. If an API exceeds the throttling limit, it will not return the service response.
-
To specify throttling in Volt MX Foundry Console, follow these steps:
- In the Total Rate Limit text box, enter a required value. With this value, you can limit the number of requests configured in your Volt MX Foundry console in terms of Total Rate Limit.
- In the Rate Limit Per IP text box, enter a required value. With this value, you can limit the number of IP address requests configured in your Volt MX Foundry console in terms of Per IP Rate Limit.
- To override throttling in App Services Console, refer to Override API Throttling Configuration.
Note: All options in the Advanced section are optional.
-
To specify throttling in Volt MX Foundry Console, follow these steps:
- Click SAVE & ADD RULE to save the rules definition (rules-set). A Rule List tab appears.
- Create Rules in a Ruleset.
- In the Rules List, click ADD RULE to add a new, if required.
- Provide the following details to create a Rule:
Field Description Name The rule name appears in the Name field. You can modify the name, if required. Rule Security Level The Rule Security Level specifies how the client must authenticate for invoking this rule
Select one of the following security operations in the Rule Security Level field.
- Authenticated App Users restricts access to clients who have successfully authenticated using an Identity Service associated with the app.
- Anonymous App Users allows access from trusted clients that have the required App Key and App Secret. Authentication via an Identity Service is not required.
- Public (All Users) allows any client to invoke this rule without any authentication. This setting provides no security for invoking this rule and should be avoided if possible.
- Private (Internal Server only) blocks access to this rule from any external client. It allows invocations only from within the same runtime environment either from an Orchestration/Object Service, or from custom code.
Note: The field is set to Authenticated App User, by default.
- Configure your business rules logic in the Rule Logic text field. This field contains sample MVEL rule logic. You can modify as per your business requirement.
-
For additional configuration of request (or) response rules, provide the following details in the Advanced section.
Additional Configuration Properties Additional Configuration Properties allows you to configure service call time out cache response. For information on different types of configuration properties, refer Properties. Front-end API Front-end API allows you map your endpoint (or) backend URL of an operation to a front-end URL. For detailed information, refer Custom Front-end URL. Server Events Using Server Events you can configure this service to trigger or process server side events. For detailed information, refer Server Events. Note: All options in the Advanced section for operations are optional.
- Enter the Description for the operation.
- Click SAVE RULE. Now, you can configure input request and response output for your rule. The following sections detail how to create input and output operations for rules.
Configure Request for a Rule
-
In the Request Input > Body tab, do the following:
-
Click Add Parameter button to create new entries for the input.
Note: - To make duplicate entries, select the check box for the entry, click Copy, and then click Paste.
- To delete an entry, select the check box for an entry, and then click the Delete button. - Configure parameters in the client's body, do the following:
Field Description Name It Contains a Unique Identifier. Change the name if required. Value Select Request or Session. It is set to Request by default.
- Request indicates that the value must be retrieved from the HTTP request received from the mobile device.
- Session indicates that the value must be retrieved from the HTTP session stored on Volt MX Foundry.
- Identity If this is selected, you can filter the request parameters based on the response from the identity provider. For more details to configure identity filters, refer to Enhanced Identity Filters - Integration Services.
TEST VALUE Enter a value. A test value is used for testing the service. DEFAULT VALUE Enter the value, if required. The default value will be used if the test value is empty. Datatype Select one of the following data types.
- String - A combination of alpha-numeric and special characters. Supports all formats including UTF-8 and UTF-16 with no maximum size limit
- Date
- Boolean - A value that can be true or false.
- Number - An integer or a floating number.
- Collection - A group of data, also referred as data set.
Encode Select the check box to enable encoding of an input parameter. For example, the name New York Times would be encoded as New%20York%20Times when the encoding is set to True. The encoding must also adhere to the HTML URL encoding standards. Description Provide a suitable description.
-
-
In the Request Input > Header tab, do the following:
-
Click Add Parameter button to create new entries for the input.
Note: To make duplicate entries, select the check box for the entry, click Copy, and then click Paste.
- To delete an entry, select the check box for an entry, and then click the Delete button. -
Configure parameters in the client's header, do the following:
Field Description Name It Contains a Unique Identifier. Change the name if required. Value Select Request or Session. It is set to Request by default.
By default, this field is set to Request. Five different options are available in Volt MX Foundry under Request Input > Headers > VALUE during configuration of any operation. When you start editing this field, dependent identity services are auto populated. These options primarily determine the source of the value of the header.
- Request: If this option is selected, the Integration Server picks the value pairs from the client's request during run time and forwards the same to the back-end.
User has the option to configure the default value. This default value is taken if the request does not have the header. - Session: If this option is selected, the value of header is picked from session context based on the user configuration.
- Constant: Constant is used to configure the value that is picked and sent to back-end by the Integration Server during the run-time.
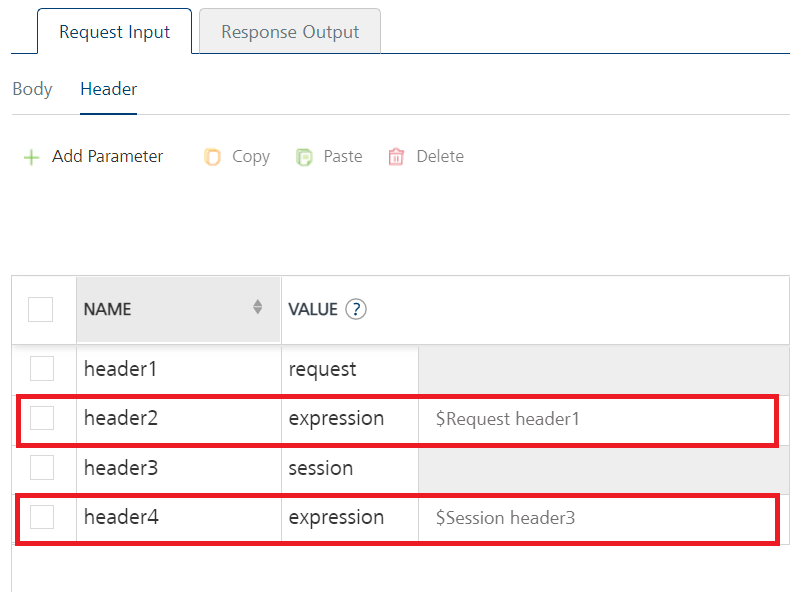
- Expression: Select this option to configure the velocity template expressions for the header values.
You cannot edit the default value for expression. -
Identity: If this is selected, you can filter the request parameters based on the response from the identity provider. For more details to configure identity filters, refer to Enhanced Identity Filters - Integration Services.
Note: If the header value is scoped as a Request (or) Session and the same header is accessed under the Expression header value, then the expression must be represented as $request.header (or) $session.header.
Example: If a header 1 value is a request and header 2 value is an expression, then the value of the expression must be $Request.header1.
TEST VALUE Enter a value. A test value is used for testing the service. DEFAULT VALUE Enter the value, if required. The default value will be used if the test value is empty. Datatype Select one of the following data types.
- String - A combination of alpha-numeric and special characters. Supports all formats including UTF-8 and UTF-16 with no maximum size limit.
- Boolean - A value that can be true or false.
- Number - An integer or a floating number.
- Collection - A group of data, also referred as data set.
Description Provide a suitable description. - Request: If this option is selected, the Integration Server picks the value pairs from the client's request during run time and forwards the same to the back-end.
-
- Click SAVE RULE to save the rule. The system updates the rule's definition.
Create Response for a Rule
-
Click the Response Output tab, and enter the values for required fields such as name, path, scope, data type, collection ID, record ID, format, format value, and description.
Note: If you define parameters inside a record as the session, the session scope will not get reflected for the parameters.
-
Click SAVE RULE to save the rule. The system updates the rule definition.
If you click Cancel, the Edit Service Parameters window will close without saving any information.
Note: You can view the service in the Data Panel feature of Volt MX Iris. By using the Data Panel, you can link back-end data services to your application UI elements seamlessly with low-code to no code. For more information on Data Panel, click here.
Note: By using Iris SDKs, you can invoke the Rules in a Ruleset, similar to integration services. For more details on Foundry Integration Service SDKs, refer to Iris SDK > Invoking an Integration Service
Built-in Objects
The following objects help you to write rules in Volt MX Foundry.
| Objects | Description |
|---|---|
| "configurationParameters" | Used to access the Server and Client App parameters that are set by the developer in the App Services console. This is equivalent to using ConfigurableParameters in Java. |
| "customMetrics" | This is used to access custom metrics. For more details to create custom reports and Metrics, refer Custom Reporting – Metrics, Reports, and Dashboard Guide |
| “deviceHeadersMap” | Used to set headers that are passed to the client and is equivalent to using setDeviceHeaders in Java. |
| "headerMap" | Used to access the header map of a request. A client can directly access the header map or the individual key-value pairs of the header map. |
| “identityHandler" | Used to access the identity attributes when a service is protected by an identity service. |
| "inputMap" | Used to access the input map of a request. A client can directly access the input map or the individual key-value pairs of the input map. |
| "logger" | Used to add a log statement with the appropriate level. |
| "response" | Used to modify the response body and is equivalent to using setResponse in Java. |
| "results" | Used to modify the results. The Result is a collection of Params, Data-sets, and Records. For more details, refer Result. |
| "resultCache" | Used to perfom read/write in the cache. This is equivalent to using ResultCache in Java. |
| "servicesManager" | Used to invoke any service with the specified service id, operation id and version. |
| "session" | Used to modify the session that is associated with the request. For more details, refer Session A client can access values from the session and the individual attributes of the session. |
| “statusCode” | Used to set the status code of the response and is equivalent to using setStatusCode in Java. |
| "ua" | Used to access the User Agent Header of the request. |
Built-in Functions
The following functions help you to write rules in Volt MX Foundry.
| Functions | Description |
|---|---|
| "Check.isWithin" |
Checks if an element is in a specified range. It will return true if the element present in the specified range, otherwise false.
|
| "Check.isEmpty" |
Checks if a CharSequence is empty ("") or null.
|
| "Check.isNotEmpty" |
Checks if a CharSequence is not empty ("") and not null.
|
| "Check.isBlank" |
Checks if a CharSequence is empty (""), null or white-space only.
|
| "Check.isNotBlank" |
Checks if a CharSequence is not empty (""), not null and not white-space only.
|
| "Check.isEqualTo" |
Compares two CharSequences, returning true if they represent equal sequences of characters.
|
| "Check.isEqualToIgnoringCase" |
Compares two CharSequences, returning true if they represent equal sequences of characters, ignoring case.
|
Sample Rules
Modify request input
| Use case |
Changing request input before evaluating the rules. For example, you can map the account type received from the request to an account code. |
|---|---|
| Rule |
The given sample rules above checks the account type, if the account type is Loan Account, then the associated account code is set to 1. The |
Modify result
| Use case |
Modifying the result of an operation. For example, you can add the account type in the result depending upon the account code. |
|---|---|
| Rule |
The given sample rule checks the account code, if the account code is equal to 1, then the account type parameter is set as Loan Account. The |
Modify response, status code and headers sent to a device
| Use case |
Changing the response body, status code, and headers that are sent to the device. For example, you can categorize the customer based on the quarterly average balance and send specific headers to the device to render appropriate UX of client application. |
|---|---|
| Rule |
The given sample rule checks the quarterlyAvgBalance parameter. If the parameter is greater than or equal to 100000, then the response body, status code and headers sent to the device are changed. The The The |
Access cache
| Use case |
Accessing data from the cache. For example, you can populate a country code in the cache if it is not present. |
|---|---|
| Rule |
The given sample rule checks the stored value in the cache. If the cache is empty, then the country code is added to the cache. The |
Invoke service
| Use case |
Invoking any service inside a Rule. For example, you can invoke an SMS or email service based on a request parameter. |
|---|---|
| Rule |
In the sample, based on the parameters sent from the device, we are invoking services either to send an SMS or email or both. The |
Access Identity data
| Use case |
Accessing the Identity data. For example, you can access the Identity data such as the app id and the user profile for the request. |
|---|---|
| Rule |
The given sample rule accesses the identity information such as first name, last name, email id, and app id and sends it to the device. The |
Access session
| Use case |
Accessing data from the session. For example, user can check user type from the value inserted in session if user is preferred one and set interest rate accordingly. |
|---|---|
| Rule |
The given sample rule checks for if isPreferredBankingSession attribute is available in session and sets interest rate accordingly. The |
Access Configurable Parameters defined in App Services
| Use case | Access configuration properties. |
|---|---|
| Rule |
The given sample rule checks the encrypt property. If the encrypt property is enabled in the client properties, then the code fetches the encryption key from server properties and adds the key to the request. The |
Access custom metrics
| Use case | Access custom metrics. |
|---|---|
| Rule |
The given sample rule assigns values to the custom metrics. The |
Multiple rules in same Rule
| Use case |
You can write multiple rules in the same rule by using Note: Please do not give separator after last rule. |
|---|---|
| Rule |
The given sample rule invokes multiple rules. |
Iterate over a set of values
| Use case | Iterating over a set of values. |
|---|---|
| Rules |
The given sample rule iterates a books dataset and adds discounted prices for each book in the dataset. |